Showing posts with label Window 8 Tricks. Show all posts

How To Increase your hard disk Read and Write speed

0 comments
For this we need to configure a special buffer in the computer’s memory in order toenable it to better deal with interrupts made from the disk.

This tip is only recommended if you have 256MB RAM or higher.

Follow these steps:

1. Open Run Command –> Start–>RUN

2. Type SYSEDIT.EXE

This will open system editor window
Expand the system.ini file window.
Scroll down almost to the end of the file till you find a line called [386enh].
Press Enter to make one blank line, and in that line type
Irq14=4096

Note: This line IS CASE SENSITIVE!
Click on the File menu, then choose Save.
Close SYSEDIT and reboot your computer
Done. Speed improvement will be noticed after the computer reboots.
Extra Points:The most speed improvement is visible with IDE drives; however there are reports that this tweak also does good for SCSIdisks. In any case, it won’t harm your system, so don’t worry to try it and post any comments here
Read More ->>

Trick to Edit Hosts File in Windows 8

0 comments


What is a Hosts File?

Just in case if you don't know ,a Host file is where you can manually enter a Hostname and IP to manually bypass a DNS Server.Generally to block a website.

Steps to Edit Hosts File in Windows 7:


1.In windows 7 click on start and then search for Notepad.
2.Now you need to right click and then choose Run as Administrator.


3.Now in Notepad click on File -> Open.
4.Now a new windows will pop-up.In this windows follow the below navigation.
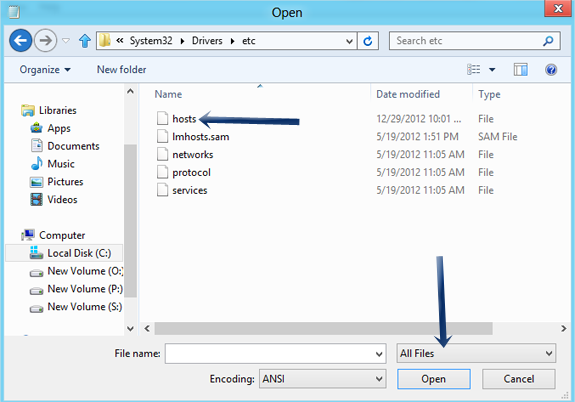
Local Disk C:>Windows>System 32>Drivers>Etc.Change the File Type from .txt file to All files.Then the Hosts File Will Show Up.
open+host+file

5.Now select the hosts file and edit as you want.

Steps to Edit Hosts File in Windows 8:

1.In windows 8 start button is absent so here you need to hover to right and wait for the Charms Bar to appear.
charms+bar
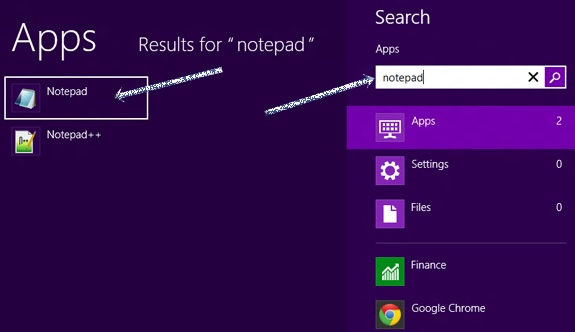
2.Choose the option Search in Charms Bar and now search for Notepad.


search+for+notepad

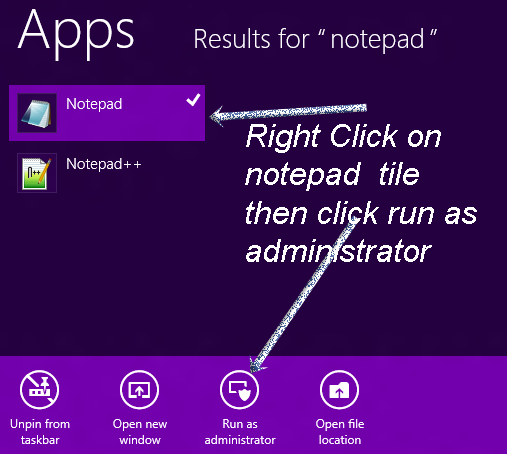
3.After Notepad tile shows up ,Right click on it and then choose Run as Administrator at the bottom.

run+notepad+as+administrator+in+windows+8

4.Now a windows will popup for confirmation.Choose yes.
5.After this all the steps are similar as in Windows 7.
6.Now in Notepad click on File -> Open.
7.Now a new windows will pop-up.In this windows follow the below navigation.
Local Disk C:>Windows>System 32>Drivers>Etc.Change the File Type from .txt file to All files.Then the Hosts File Will Show Up.

open+host+file

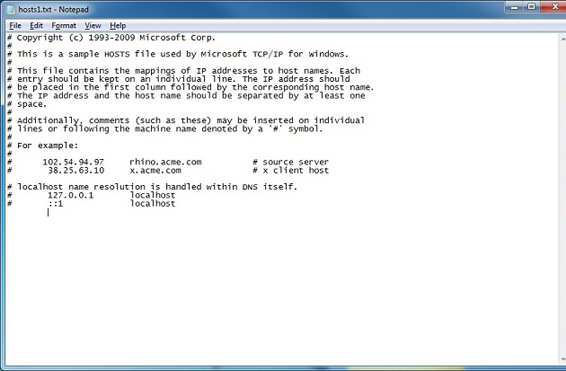
8.Now select the hosts file and edit as you want.

Edit-Host-File

If you have any trouble in editing hosts file, let us know in your comments.

Never miss a new update again. Join my blog for free and get valuable Hacking Tricks,Security Tips,Safety Tips delivered right through your inbox.


Read More ->>

How to Extend Windows 8 Trial Period of 90 days

0 comments
Microsoft has officially released evaluation edition for free for 90 days.It comes with all the features of Windows 8 Pro Edition.In this post we will discuss how to extend 90 days trial of Windows 8 pro and use it for 90 more days.So in total 90+90=180 Days.
If you don't know Rearm is a inbuilt feature of windows 8 which will extend the trial period of all editions of Windows 8.This methods isn’t anything cracking or illegal method to activate Windows 8.If you want to continue trial version for some more days, re-arm Windows 8 Evaluation version.

How to Extend Windows 8 90 Days Trial: 

  • If you have not yet downloaded windows 8 edition then you can Download Windows 8 PRO Edition for Free from here.
  • Once you download the Enterprise Edition and install it on your PC you can use it for trial for 90 days for free.
  • A watermark will be visible on the bottom right corner of the desktop background showing the number of days remaining for activation.
  • Once the trial period is over you will be demanded to buy windows 8 pro edition.If you don't want to buy and use it for trial for some more days then follow the below steps.
  • Once the trial period is over you need to re-arm your windows 8 edition to extend the trial.This feature was available for windows 7 and Microsoft office as well.

Follow below steps to Re-arm Windows 8 Edition:

  • Once you notice the trial period is over or about to complete you need to re-arm to use it for 90 more days for free.
 
    • First open Command Prompt(CMD).The most important thing to execute this operation is to Run command prompt as Administrator.
     
     
      • Once command prompt pops out run the following command.
      Run this command:  slmgr /rearm
      • As soon as you run the command you will get a pop up notification to restart your PC.
       
       
        • Once you restart your PC it will set to 90 days trial again.
        It is recommended to run this command on the 89th day so that you will get more 90 days from that day.

        Few more Commands: 

        There are few more commands to check the activation details of your windows Operating system.
        To check the current license information of Windows 8:    slmgr /dli
        To check the detailed information of the current license type:  slmgr /dlv
        To check the expiration date of the current license:  slmgr /xpr
        Read More ->>

        Common Window 8 Installation Errors

        0 comments
        Window 8 has become very popular within the very few days of release. More than 5 millions of upgrades that have been sold a few days after the release. Even though it might take time for some of the customers to get acquainted to the features of window 8, it is expected to be very easy to use and understand when installed in their computer once they understand it.


        Just like windows 7, this windows it offer the user the option of having a clean installation or upgrading from the previous version.It allows one to choose the desired option. It all begins with happiness after upgrading the personal computer to windows 8, but later one may start experiencing some problems during the installation or after completion of installation.

        Black/Blank Screen after Installation:

        Among major problems faced by computer users after installation of windows 8 is the blank screen. Many of them are left wondering what might have gone wrong since the installation was successful. It has been noted that the installation of Windows 8 goes well without a problem and the blank screen only appear afterwards. The computer user might not have an idea of the procedure they have skipped. When one is faced with the problem of the blank screen, they could get assistance from windows 8 support. One can also apply the following steps to fix this problem. The problem can be solved by creating a bootable DVD or USB and then try installing it. In case it does not fix the problem, make changes to the settings of the computer BIOS by making it play and plug operating system enabled. Ensure that the security software like the firewall and antivirus are disabled.

        Missing Important Driver or Files:

        It is common to receive an error message of being the installation process being unable to take place because there are missing drivers and the error requests the BIOS to be entered during or after the installation process. The problem is mainly during the selection of the disk to install the OS. The problem can be solved by holding on the Alt key on hearing a beep when the computer is rebooting. The key should be held until a whirling gear is seen and then the OS is selected as the start up drive. The method is only applicable when installing windows 8 on MacBook air.

        Failed Upgrade

        The problem of failed upgrade is usually attributed to several things. The user should ensure that their computer meets minimum requirement for their system to hold windows 8. The antivirus and firewall should be disabled to allow the upgrade to go smoothly. The Internet connection should be strong enough to complete the installation process. A valid license key of the OS should also be available. When using the touch functionality, one should ensure that their computer is able to support the multi-touch.
        When facing problems with upgrading windows 8, it is advisable to have a clean installation. If the problem persists, the user can seek expert help from the windows 8 support. After solving the above problems, Windows 8 will allow you to explore your computer world.

        Some more windows 8 Guides:


        Read More ->>

        Basic Steps to Install Windows 8 from USB Drive

        0 comments
        There are many ways to make a bootable USB/Pendrive.Here we will be discussing an easy way and also the old traditional way which is a little complicated method to create a Bootable Pendrive.After making a bootable drive then the process to install windows 8 is very simple.

        1.Installing Windows 8 Using WinToBootic:

        WinToBootic indeed works amazingly well as it creates pen drive bootable by which windows 8 can be installed without any sort of problems or worries.

        Following are the ways to install it:

        • It is important to download WinToBootic and get the program installed


        • Now, as you run the program, there will be a window which will pop similar to what has been show in the figure below

        This is the time when the software is going to detect the thumb drive. If in case it does not, then you need to go to drop down and select your source by clicking on arrow . One thing you need to make sure is that your thumb drive is formatted in NTFS format. It can be easily done at the start of computer (START+E). Thereby, click right on thumb drive. After all, you need to click on format and choose NTFS mode and finally by clicking on “OK” you will format the drive very easily and convincingly as well.
        As you drag iso file onto it, it  will look similar to the figure below


        Now, the moment you click “Do it”, there will be a pop up which is shown below. You have to be quite sure that your drive is correct and that every thing is in order as well.


        Now, after you click “OK”, the process will start and the software is going to copy Windows 8 to the pen drive.
        There are more installing pictures in order to help you understand in a clear and concise way as well.


        Hence, you will be able to install windows 8 from the bootable usb drive.

        2.Basic old Method to create a bootable USB Drive:

        You need the following things
        4 GB+ USB flash drive
        Windows 8 ISO file or DVD
        A PC with Vista, Windows 7, or Windows 8 OS
        1. Now, as all the items are available, you need to access your drive and ensure backup of those files which were previously on the drive
        2. Secondly, you need to Navigate to Start> All Programs> Accessories, thereby click on Command Prompt and finally select Run as administrator. Click on “Yes” if you receive UAC prompt.

        1. This specific task can be accomplished as you type “cmd” in the start menu search box along with pressing Ctrl+ Shift + Enter
        2. As soon as the command prompt is up and running in the following way, press enter
        Windows 8 DISKPART


        5. The next step is to type in LIST DISK and for checking disk number for your connected USB, you need to hit Enter. In order to help you understand a bit more clearly, I have used my USB drive as “1”. You can crosscheck for the correct drive against their sizes”.


        You need to make utmost sure that DISKPART in any case has detected USB flash drive. However, if it has not been detected or you are facing any sort of problem, then the best thing you can do is to reconnect your USB by following the aforesaid steps once again.
        Space
        Following are the list of commands which you have to run and hit “Enter” after each of them so that it can easily be able to run:
        SELECT DISK 1 (your USB disk number might vary)
        CLEAN
        CREATE PARTITION PRIMARY
        SELECT PARTITION 1
        ACTIVE
        FORMAT FS=NTFS
        (The time varies as it depends on the size of the drive)
         ASSIGN
        EXIT


        Now, you need to proceed towards the next step. You do not have to close the command prompt window.
        1. In order to access the windows 8 ISO file, you have to mount it to virtual drive
        As soon as the ISO is mounted, you need to take note of the drive letter for the virtual drive
        If in case you have a bootable windows 8 disk, then insert it in cd tray and write down the letter for the drive it leads onto
        7. Now, type in the following after re opening the command prompt window
        G: CD BOOT and click on enter. (“G” stands out for your DVD drive letter or mounted virtual drive letter)
        CD BOOT and click enter.

        8. It is almost completed. Now simply type in BOOTSECT.EXE /NT60 J: (“J” stands for you USB flash drive letter and it is easily found in explorer) and now simply hit Enter Key


        9. Now the time has come for you to open Windows 8 cd and you have to copy the content to root folder of your boot USB

        It is to be noted that in order to boot from a USB, you have to make this option active by going to BIOS settings which is there on the target system.
        Never miss a new update again. Join my blog for free and get valuable Hacking Tricks,Security Tips,Safety Tips delivered right through your inbox.


        Read More ->>

        How to Launch File Explorer with Drive List

        0 comments
        In Windows 8 and Windows 7, when File Explorer is launched via the Task bar shortcut, Libraries are shown by default, which is not useful to us. But If I show the tweak that when you click on File Explorer via the Taskbar then My Computer opens with a drive list. Here is simple tweak to follow.

        • Right Click on the File Explorer which is on the Taskbar.


          • Then Select Properties, it will open File Explorer Properties.

          • Now change the Target Location to the following:%SystemRoot%\explorer.exe ,::{20D04FE0-3AEA-1069-A2D8-08002B30309D}

          • And click OK, you have done successfully.


          Read More ->>

          How to Enable Num Lock on the Windows 8 Logon Screen

          0 comments
          Some user believes that there is a setting in Computer BIOS that num lock will not be enabled automatically on the logon screen. But let's think that you have enabled the user authentication while logon and your password will be in numerical.


          So, if you want to enter in the Operating System speedily you have to turn first Num Lock On then type, if in case you forget to turn on then password will be wrong.

          Here is the simple tweak to Enable Num Lock on the Windows 8 Logon Screen.


          • Open "run" (Win Key + R), type "regedit" (without quote) and hit enter.
          • After that one window will appear, as shown in below image.
          • Now Browse to this location: HKEY_USERS\.DEFAULT\Control Panel\Keyboard
          • Then edit the value of InitialKeyboardIndicators and set it to a value of 2.
          • Done successfully.

          Read More ->>

          Windows 8 Keyboard Shortcut Tricks

          0 comments

          Today, I want to introduce Keyboard Shortcuts so that you can use Windows 8 quickly and efficiently. So, let's useful Keyboard Shortcuts to improve relationship with your new OS.

          General Windows 8 Shortcuts

          Win – Display Start Menu
          Win + Mouse Scroll Wheel – Zoom in and out on the Start Menu
          Win + L – Lock your PC and return to logon screen
          Win + P – Projector options
          Win + X – Admin tools menu
          Win + Enter – Starts Windows Narrator
          Win + (plus sign + ) – Screen zoom in
          Win + (minus sign - ) – Screen zoom out
          Win + Print Screen – Saves a screenshot in the picture library screenshot folder
          Print Screen – Saves a screenshot to clipboard
          Alt + Tab – Classic app switcher
          Win + Tab – Metro app switcher
          Alt + F4 – Close application (Desktop and Metro)
          Tab – Select different items
          Ctrl + C – Copy
          Ctrl + X – Cut
          Ctrl + V – Paste

          Metro / Modern Shortcuts

          Win + C – Displays charms
          Win + Z – Displays app bar
          Win + I – Settings side menu
          Win + K – Devices menu
          Win + H – Share menu
          Win + F – File search
          Win + Q – Application search
          Win + W – Settings search
          Win + (period . ) – Snap Metro app to the right
          Win + Shift + (period.) – Snap Metro app to the left
          Arrow keys + spacebar – Select app tile

          Desktop Shortcuts


          Win + D – Show Desktop

          Win + M – Minimize to Desktop
          Win + R – Run
          Win + T – Taskbar previews
          Win + U – Ease of Access Center
          Win + Pause / Break – System Information
          Win + comma – Peek at desktop
          Ctrl + Shift + Escape – Task Manager
          Win + Right Arrow – Aero snap right
          Win + Left Arrow – Aero snap left
          Win + Up Arrow – Aero snap full screen
          Win + 1 through 9 – Launched applications pinned to the taskbar

          File Explorer Shortcuts

          Win + E – Open File Explorer    

          Ctrl + N – Additional File Explorer window
          Alt + F + P – Open Command prompt at current location
          Alt + F + r – Open PowerShell prompt at current location
          Ctrl + Mouse Scroll Wheel – Change view
          Ctrl + Shift + N – New Folder
          Alt + Enter – Selected File/Folder Properties
          F2 – Rename selected item
          Ctrl + F1 – Show or Hide Ribbon
          Alt + Up arrow – Navigate up a folder
          Alt + Left Arrow – Navigate to previous folder
          Alt + Right Arrow – Navigate forward

          Desktop Internet Explorer 10

          Ctrl + B – Favorites Manager
          Ctrl + D – Add site to Favorites
          Ctrl + I – Favorites List
          Ctrl + G – Feeds
          Ctrl + H – History
          Ctrl + J – View Downloads
          Ctrl + N – New Window
          Ctrl + P – Print
          Ctrl + Shift + P – Open In Private mode tab
          Ctrl + T – New tab
          Ctrl + K – Duplicate tab
          Ctrl + W – Close tab
          Ctrl + Shift + T – Reopen closed tab
          Ctrl + Tab – Switch between open tabs
          Ctrl + R or F5 – Refresh Page
          Ctrl + U – View Source
          Ctrl + F or F3 – Find on page
          Ctrl + E – Move cursor to address bar to search the web
          Alt + Home – Homepage
          Alt + Left Arrow – Back
          Alt + Right Arrow – Forward
          F10 – Menu bar
          F11 – Toggle Full Screen Mode
          F12 – Developer Tools


          Metro Internet Explorer 10

          Ctrl + E – Move cursor to address bar to search the web
          Ctrl + F or F3 – Find on page
          Ctrl + R or F5 – Refresh Page
          Ctrl + P – Print
          Ctrl + T – New tab
          Ctrl + K – Duplicate tab
          Ctrl + W – Close tab
          Ctrl + Tab – Switch between open tabs
          Ctrl + Shift + T – Reopen closed tab
          Ctrl + Shift + P – Open In Private Mode Tab
          Ctrl + L or F4 – Open address bar
          Alt + Left Arrow – Back
          Alt + Right Arrow – Forward

          All above are the useful Shortcuts that you should know while using Windows 8. Share this post so that others also can know these Windows Shortcuts. If you have any problem related these Shortcuts then put your comments in below comment box!!!
          Read More ->>

          How To Take A Screenshot In Windows 8

          0 comments
          how to take a screenshot in windows 8 without using any extra software. This is amazing function of windows eight.


           How To Take A Screenshot In Windows 8

          Step 1: Press Windows Key+ Print Screen key.
          Step 2: Press “Win Key+E” . This will open Explorer and go to Pictures directory on the left side.
          You find folder named “Screenshots” which contains your snapshots taken by you. See image below.


          And another interesting thing is windows 8 automatically names your screenshots as Screenshot (1), Screenshot (2) and so on. Isn’t it amazing function of windows eight?


           I am sure you have got your answer for how to take a screenshot in windows 8. Enjoy taking unlimited snapshots on windows 8 without use of any additional software.
          Read More ->>

          On this website can find all possible ways of making money online or Hacking Tricks or Any other field on internet world. But before you proceed, please subscribe for our email updates, so you can get the latest news instantly. Enter your email address to receive free make money online ,Hacking ,Security,Blogging news:

          Contact Us

          Name

          Email *

          Message *

          Blog Archive


          Followers

          Powered by Blogger.

          Recent Posts

          Blogger Tips and TricksLatest Tips For BloggersBlogger Tricks

          | AtiHackingTricks.blogspot.Com © 2009. All Rights Reserved |Back To Top |